Showing posts with label 31 Day Challenge. Show all posts

Saturday, 19 November 2011

Day 15 - Delicate Print

Hi Guys, 
I'm Charlie and I blog over at Charlies Wonderland!
Rachel has very kindly asked me if I would care to fill in for her while she is away and continue with the 31 day challenge! 
I picked Day 15, delicate nails.... Why oh why I did is beyond me! I was struggling and struggling to think of something that did not include stamping (due to lack of stamping gear .... please santa!)  
So anyway, I went to a wedding (sounds odd as I am typing this on Thursday in preperation for my very busy weekend!!) anyway, I went to my future (i hope) brother and sister in laws wedding yesterday and I knew how I wanted my nails, due to them being bitten right down I also knew it would call for some falsies!  
So off I popped to the cheapy shop where I get all my false nails from, and I got some for 99p! I also picked up some little pearls while I waws there, they can be used for allsorts they are nail specific ones. 
I got home and set to work. I knew Id have a hard time trying to stick the pearls on once I had the nails on my fingers so I decided I would do the nails first then stick them on!
Never Again!! I spent most of the afternoon chasing nails around my desk, and getting them stuck everywhere! Oh and then when I did finally stick them on realised I had forgotten to make them shorter so they are friggin huge!
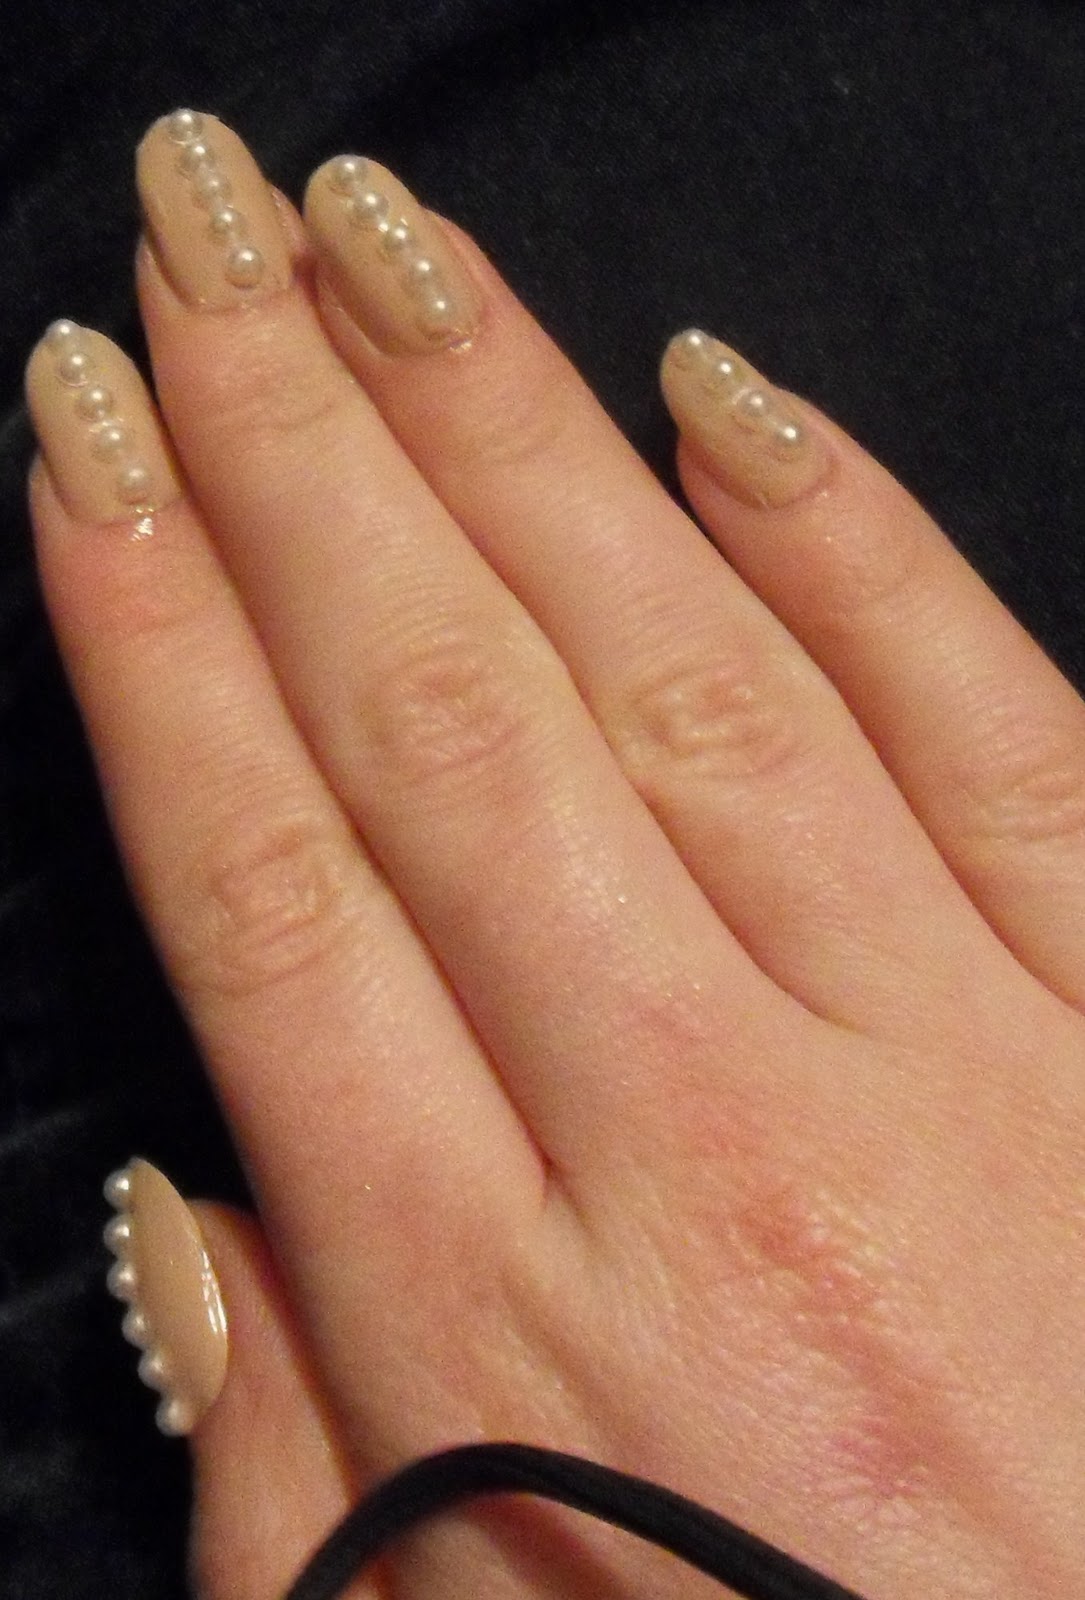
Anyway so I eventually finished and this is what they look like, I hope that you like them, I think pearls are very delicate so it does go with the challenge theme!


 I used Ciate - My fair Lady as the base, then popped the pearls on whilst still very slightly tacky, and finished with a top coat, much easier than it sounds!

A lovely close up, should of picked a better nail haha


See how I mean the nails are very long!!!


In the natural (dusky) light of my window!

There you have it guys, my delicate nails!

Check out my blog for other nail (so called) art! 

:D

Charlie
xx

Friday, 18 November 2011

Day 14: Flowers

Hi, everyone!! I'm Sarah from See Sarah Swatch, and I am so excited to guest blog on here! Thank you, Rachel-Karina!:]

Today, continuing the 31 Day Challenge, I have flowers for you!


This is 3 coats of my franken [a polish that's mixed by hand using other polishes & glitters & etc], Dusk, with Orly's Le Chateau stamped over it! I lovelovelove Le Chateau for stamping, it's so pigmented, but you can still see the teal-ness of it:]
& for fun, here's one coat of my franken alone:
It's a light purple with red shimmer and little white glitter [like clouds!]

I hope you liked my flowers, and thank you again for the opportunity, Rachel-Karina!! :]

Thursday, 17 November 2011

Day 13: Animal Print

Hi! I'm Juliet and I blog over at ever so juliet.

I was really pleased to be picked as a guest blogger - thanks so much Rachel-Karina! I'm going to continue the 31 Day Challenge, and show you my take on animal print...


Leopard print is one of the EASIEST nail art effects to do - it's really quick and easy to do, you can use any colours that you have, and you don't have to be really neat for it to look good!  Here's how you do it.


Step 1. Paint your nails a base colour. I've gone for a light yellow (so the leopard print effect will really stand out). I'm using Models Own lemon meringue which I really like, it goes on smoothly and doesn't need too many coats.


Step 2. Once your base is dry you can start adding the little splodges that make up the spots! I've gone for a lilac colour (so used two coats on each dot) and place these randomly around each nail. Try to leave space between each dot (better to have only a few than too many!), and put them in a slightly different position on each nail.


Step 3. Try to wait until these spots are totally dry (shouldn't take too long) then get your nail pen, kirby grip or cocktail stick (all are brilliant for this!) to draw little circles, c-shapes and dots around each of your splodges. Don't worry about being neat - this looks best when each nail is different and a little uneven.

Once you've drawn round all of your splodges, fill in any gaps with little black dots or c-shapes.


& that's it! It takes about 15 minutes (if that) and most of the time is spend waiting on the different layers to dry.


Juliet x

Wednesday, 16 November 2011

Day 12: Striped Nails

First of all I'd like to say that I am an awful blogger! I was sososo busy today with packing I didn't even have time to do a mani, so I'm recycling my NOTD I did a while back. Forgive me?!
I know they're not completely stripy, but it's the best I have without re-using the purple nails I did.
The base colour I used was ELF's Black topped off with LA Colors Art Deco White.
It's so simple and easy that anyone can do it!

I will be absent from my blog from tomorrow up until Sunday, so I have selected a handful of my amazing bloggers to do guest posts! I can't wait to get back and read them all. Au revoir for now, and I hope you enjoy the posts!


Tuesday, 15 November 2011

Day 11: Polka Dot Nails


I originally was going to keep it simple with the polka dot design, just having different colour bases. But I sat there and thought to myself that I wanted something bright and a bit eye catching, so I decided to do some 'neon' polka dots on a black base.
The colours I used for this were;
ELF - Black
BarryM - Shocking Pink
BarryM - Cyan Blue
Models Own - Fuzzy Peach.
I liked how this turned out, I got a few compliments when people caught a glimpse of the mani. It's one of those that need a double take if you're just on-looking. The only thing I'd change would be to make the dots smaller so I could have fit a few more colours on there. I was originally going to add some Yellow, but there was no room for it!
Are any of you lovely followers doing the challenge? If so post your link below and I will be sure to check your designs out too!


Monday, 14 November 2011

Day 10: Gradient Nails

I tried so many different ideas for this mani, but none of them seemed to suit what I wanted to do. So ultimately I gave up and came up with simple gradient lines.
Like always, excuse the poor photo, what I thought were good photos, once I uploaded them to the computer they all seem to have become blurry, not good. The lighting is to be desired too, but it's currently 4pm and it's already getting dark, gah.
So, the colours I used for this mani were;
(From Base to Tip) OPI - Yoga-ta Get This Blue
BarryM - Cobalt Blue
BarryM - Cyan Blue
BarryM - Blueberry Ice Cream
I then finished it off with a Matte Finisher by ELF.
This mani could have gone so much better, but I was strapped for time and I just wanted to get this post up! I'm trying to stop procrastinating when it comes to the nail painting part of the challenge! I just think they look so pretty when I do them I don't want to take them off!

In other news, my 4 guest bloggers have been chosen, so from Thursday - Sunday you'll be seeing their take on the 31 day challenge! I'm excited! Oh and I also went and bought ANOTHER Glamour magazine to get the Nails Inc polish. Only one more to get now!


Sunday, 13 November 2011

Day 9: Rainbow Nails

Wow, I can't believe I've actually made it to Day 9 without giving up!
Today's nails are Rainbow and I decided to do a sky with a rainbow going across it, well attempt one anyway!
For the base of all my nails I used BarryM's Blueberry Icecream. For the clouds I used a dotting tool and ELF's White. For the rainbow itself I used a small nail art brush and the following colours;
Red; BarryM - Bright Red
Orange; Models Own - Fuzzy Peach
Yellow; Models Own - Lemon Meringue
Green; BarryM - Spring Green
Blue; BarryM - Cobalt Blue
Purple; BarryM - Bright Purple
And to top it all off I added a Matte Top Coat and went over the top of that with ELF's Glitter Glam just to add a little sparkle.
I absolutely love how this mani turned out, I thought I did a good job *pat on back*. Tune in tomorrow to see my gradient nails! :)


Saturday, 12 November 2011

Day 8: Metallic Nails


Today's Nails aren't really that exciting considering I own 3 metallic polishes, two of which are silver. So I had to come up with something that doesn't just include one block colour. I decided to paint my whole nail with Models Own - Blue Moon, which is technically more of a foil than a metallic, but hey. I then did a diagonal swipe with BarryM - Silver Foil effect, again which is more of a foil than a metallic. I then separated the two colours with a plain black striper pen from L.A colors and voila. This was the outcome.
Sorry that it's such a short post today guys!


Friday, 11 November 2011

Day 7: Black & White Nails


Today I present to you my black & white nail challenge. This was the first time doing a tuxedo design on my nails, and I thought it turned out okay, except for my pinky (hence the reason you can't see it fully).
For the base colour I used E.L.F's Black polish and then a white and black nail art pen that I received in my Nail Mail post.
I'm looking forward to getting to the 'designing' stages now, I do have some idea planned out in my head, whether they will translate onto the nail, I don't know. Stay tuned to find out!


Thursday, 10 November 2011

Day 6: Violet Nails

Before I start, I'm currently looking for a few guest bloggers to post for me whilst I'm away. To find out more click HERE.

So, back to the post! Today is Purple nails day and for this I decided to use BarryM's Bright Purple & Berry Ice Cream, Saffron London in colour 05 and E.L.F's Matte Finisher.
I was originally just going to have a block colour of BarryM's Bright Purple, but I then decided to jazz it up a little with some Stripes & Glitter.
After doing so, I found with the creaminess of the polishes and the combination of the glitter, I found it to be a bit to shiny, so that's where the Matte Finisher came in handy! I was pretty pleased with how they looked when finished (minus the tiny little smudges that occurred). I just can't seem to give my nails enough time to just get their 'dry on'. Impatience is one of my fatal flaws, that's for sure.
Hopefully, when I get onto the more complicated ones I'll be able to do a step by step guide, if the lighting isn't dull and I have enough time, it gets dark at around 4.30pm in England now....BOO! I hate Winter.


Wednesday, 9 November 2011

Day 5: Blue Nails

Todays colour is brought to you by China Glaze and is their ever popular For Audrey. When I first saw this colour scattered around on blogs, I instantly fell in love with it. I held back with purchasing it as at the time I didn't want to splurge on shipping costs just to get it over here. It wasn't until I had a dream about this polish (yes, things I want tend to sneak into my dreams until I buy them) that I knew I had to have it on my nails.

For Audrey comes from the Something Blue collection and is a high gloss creme polish. A baby blue colour that is said to have been modelled on the blue Tiffany's boxes and celebrates Audrey Hepburn in Breakfast at Tiffany's. I find that it applies really thickly, probably something to do with the formula. So as long as I am armed with a mountain of cutips, I'm ready to rock and roll.

To finish off today's nails, I added my newly acquired E.L.F Matte Finisher Top Coat, and I loved the outcome!

Tuesday, 8 November 2011

Day 4: Green Nails

Today is Green Nails day and I decided to go with China Glaze - Westside Warrior from their Metro Fall collection. I was originally going to do some wacky nail art with all of the greens that I own, but by the time I got home it was starting to get dark so I needed to paint my nails and get a photo fast. I was so determined to get this photo in natural light that I even painted over the existing yellow polish just to save time, lazy I know. So that's the main reason for the messy nails too.
Anyway, back to the polish. When I first saw this colour I was instantly drawn to it, more than any of the other colours in the collection, and because it's my gamer name too. I have a few greens but I don't own any like this. Westside Warrior is a gorgeous olive creme with yellow undertones. When alone, it looks a very dark green, but when paired next to another green the yellow undertones become very apparent. Like always, I love the formula of CG polishes, they're so pigmented and buttery. I rarely ever need 2 coats with this polish, one thick coat is more than good enough for me.
This is vastly starting to become one of my favourite polishes of all time and the colour is perfect for the Autumn months.


Monday, 7 November 2011

Day 3: Yellow Nails

First of all - WE HAD SUNSHINE IN ENGLAND TODAY! *YAY* but it was still FREEZING cold. Secondly excuse the mess of my nails, for some reason I didn't notice that massive bit of polish on my fingers....how? I don't know.
Anyway, on to Day 3 of 31 and we're on Yellow Nails. I was almost not able to do this one, but luckily I have 1 Yellow polish in my collection, yes one. This is Models Own - Lemon Meringue and to be honest, I don't even like this polish, the colour itself is gorgeous, but the application is terrible, the photo is 5 coats...yes! 5!!! It just applied so streaky and blergh. Not a happy bunny.
I'm quite liking these early morning postings, it means I have the whole day to paint my nails and still have enough natural light to take the photos, instead of having to paint them at night and try and find the best place in the house with the best lighting, it's a nightmare I tell you.

On the plus side, I've just placed an order on the pre-sale of Cult Nails Superpowers collection. Super excited for that to arrive! :) Hope you've all had a good weekend and enjoyed the fireworks last night! Back to reality again now guys.


Sunday, 6 November 2011

Day 2: Orange Nails

First of all, please excuse the terrible lighting, I was so disheartened by my red nails falling to pieces I thought I may aswell crack on with Day 2, and technically it is past midnight in the UK, so this counts as a new day!
*Note to self: Must invest in a better quality camrea*
So todays nail challenge is Orange nails. I did cheat a little, as I believe these are supposed to just be block coloured nails, but who cares? They're still all with the 'orange theme'
For my base colour I used BarryM - Coral which is a bright orange with a reddish undertone and is one of my favourite Summer colours to wear.
For the stamp colour I used BarryM - Peach Melba which is a pale, milky peach colour and is definitely one of those staple Spring colours. For the flowers I used Bundle Monster's BM224 image plate.


I'm quite pleased with how this turned out ^.^ as it was my first attempt at stamping, which explains why  they're a little wonky!

Thanks for stopping by! And if I remember, I will try and take an outdoor picture to replace the one above, but there is NO sunshine whatsoever in England anymore :(


Saturday, 5 November 2011

Day 1: Red Nails

First of all, why does the colour look pink? Strange....Anyways, this manicure lasted all of 5 minutes as the rhinestones came off as soon as I'd taken the pictures. So that's a fail straight away, oh well.

For the base colour I used E.L.F's Red Velvet which is a gorgeous red shimmer polish. It does have a little bit of a pink undertone, as you can see. It does, however, remind me of the inside of a red velvet cupcake, and my god do I LOVE those!

So yeah, this is the Red Nails post! To be honest I'm looking forward to getting to the more challenging parts of this, one coloured nails seems to just bore me.


31 Day Blog Challenge

Okay, so I have been meaning to do this challenge for AGES now, I've seen it floating around the blogging community and I thought it would be something to challenge my nail art ability (which as of now isn't very 'pro') and seeing as I've gotten my Bundle Monster image plates I thought now would be as good a time as any to get started! Also I've been lacking creativity recently so this gives me something to go by.
I've done a blog challenge before, but I never seem to finish them, however this time WILL be different, I promise. If anyone else would like to join me in doing this, I'd love to be able to see what you come up with, and will post a link to your posts when writing mine!
Stay tuned for the results!