Showing posts with label Nail Art. Show all posts

Monday, 29 July 2013

piCture pOlish Blog Fest 2013: Year Of The Blogger

Hi ladies! It's been a while, I know. I'm actually taking a break from blogging right now mainly because my nails aren't in too good-a-shape at the moment after spending the last 5 months learning how to do acrylics & gels with countless applications to my nails, so they're feeling a little weak and unloved but for now I have a special one off post for you. A while back piCture pOlish advertised for new bloggers to take part in their blog fest for this year, having missed out on the opportunities in the past, I thought that now was as good a time as any to put myself forward. I'd actually forgotten about it until I got the e-mail saying I'd been chosen, needless to say I got a little excited.

However, unlike previous years, this year is a little different, instead of the chosen bloggers receiving a couple of the new collaboration shades to debut, we were given the task to 'create your most amazing nail art manicure ever' using the 3 unknown shades being provided to us by piCture pOlish. Since we didn't know the polishes we were to be using until they arrived, pre-planning a manicure was exceptionally hard, even more so because I am in no-way creatively inclined.

When my piCture pOlish arrived, I pondered over the possible nail art ideas for DAYS until I finally settled on my 'final piece' which was inspired by this negative space manicure I saw on Chelsea's Get Nailed. We were told when creating the manicure, that we could use any accessories/stamping/Black & White paint to help aid us, but the 3 piCture pOlish shades provided must shine through and not be overshadowed so baring all that in mind, I created this;


As you can see from the top photo, I was sent Hot Lips, Jade and Violet Femme which are all gorgeous on their own, but together? They just compliment each other so well. It wasn't until after I had finished the manicure, I realised I needed to make a tutorial, so I've quickly re-created the process of my ring finger using The Nail Trainer.


In hindsight, had I known the direction I wanted to go with this mani, I would have skipped step 6 and added the studs straight away, following the same pattern as they would have been enough to cover the connecting lines. I'm absolutely in LOVE with this mani, just the way the three colours all compliment each other perfectly and how vibrant they all are.


If you love this mani as much as I do, I need your help! piCture pOlish are going to be running a competition their Pinterest between all the bloggers participating in Blog Fest this year where all nail art creations go into the running to be chosen to create a collaboration shade with piCture pOlish launched in 2014! How exciting!!! VOTING IS NOW OPEN HERE FOR 24 HRS ONLY
However, there are only 3 awards that will be voted and chosen as follows via our special Pinterest Blog Fest 2013 board:

  • 1 x Award - as voted by PP friends and fan - THAT'S YOU LADIES!
  • 1 x Award - as voted by all participants of Blog Fest 2013
  • 1 x Award - as voted by Jules & Megs of piCture pOlish

I'm super excited and anxious to see who else is participating in Blog Fest 2013 and find out what other amazing Nail Art creations have been entered!

To make sure you don't miss out on the announcement to vote, make sure you add all of piCture pOlish social media networks; Facebook, Twitter, Pinterest, Instagram & YouTube

Also, if you'd like a bottle of Jade, Hot Lips or Violet Femme of your own, piCture pOlish can be purchased directly from picturepolish.com.au, who ship Worldwide, or alternatively you can purchase through their international network. If you're making an order directly from piCture pOlish with 4 polishes or more, check out their Everyday Deals page for the opportunity to get 1 or 2 FREE shades with your order!

Tuesday, 12 March 2013

NOTD: My First Glitter Gradient & New Blog Layout

Hi ladies! You may notice Polished Criminails has had a little make over. It's been a long time coming, and I'm not 100% happy with the layout as it is at the moment but since I received my brand new customised blog banner from the amazingly talented Gia from Lovely Serendipity yesterday, I needed a new layout to match! I'm still getting used to using X-Large pictures on my blog, to me they seem a little too big, but I'm sure as time goes on I will get used to that!

To celebrate my new banner and layout I thought I would also match my first post with the colour scheme by attempting my first ever glitter gradient! I started out with a base of Headline Colours - Poolside Party* (collection post coming soon) and used China Glaze - Lorelei's Tiara* for the gradient. I smoothed everything over with Eye Candy London - Gel Wrap Top Coat*! I'm really happy with how everything turned out, especially since this was my first ever attempt at a glitter gradient! Enough talk...let's see the finished result!


What do you think to my brand new layout and my first attempt at a glitter gradient? I love the way the colours work together! Stay tuned for some upcoming posts including the brand new Spring/Summer Collection from Headline Colours, formerly known as Killer Colours, Nails Inc Leather Effect in Noho and some swatch spam from Sation, Catrice and Essence!


The product(s) in this post that are marked with a (*) have been sent to me by the company or their PR team for my honest review.

Friday, 8 March 2013

NOTD: Stamped Gradient

Hi ladies! This is a bit of a different post today, I never usually post Nail Art posts outside of a challenge, but since I'm completely out of fresh swatches, I thought I would post this as a substitute. Please excuse the crap photo quality/clean up. It looked a lot better *I thought* IRL and I took these very early morning before running out the door to go to work.
I started out with a base of OPI - My Boyfriend Scales Walls to bring out the gradient colours that little bit more, then using a cut up make-up sponge, I painted a strip of OPI - Can't Find My Czechbook and OPI - You're Such A Budapest from the new Euro-Centrale collection (swatches of my picks will be coming shortly). After the gradient was dry, I knew I wanted something stamping over the top, so I went through various image plates before settling on CH-53* from the Cheeky Summer 2012 collection, which was stamped using a White polish from the Rio Nails Stamping set*. I finished off with Eye Candy Gel Wrap Top Coat* to smooth out the Gradient and protect the stamping and here is the result.


I was really pleased with the overall look of this mani, and it's only the second time I've ever done a gradient! it took a while for me to make sure the transitions were good enough, but I think I got there in the end. To give you an idea of how pleased I am with this, I did this mani on Monday night and I'm still wearing it now! Yes, that's 5 days of the same nails, which is a rarity. The best thing? There's only minor tip wear!
What do you guys think? Would you like to see more of my stamping adventures or would you rather me stick to swatching terribly.

Monday, 4 February 2013

Review: BornPrettyStore Studs

Hi ladies! I was recently contacted by bornprettystore asking whether I'd like to review one of their products, of course I said yes. I've been wanting to get my hands on some studs for a while now but haven't come across some I really like. Until I came across these - the colours, the shapes and the sizes were exactly what I wanted. I have a couple mani's to show you in which I used various studs from the wheel, you'll have to excuse the second mani, I did it late at night so I had to use my light box and artificial lighting, but my camera doesn't like when I do that and 99% of the photos I took were a blurred mess. Luckily, you can still see all the detailing.


As you'll see, there is a huge difference in nail length between mani's, I had a little accident with the nail clippers whilst trying to attempt to trim them slightly....so unfortunately, I had to cut them all down to nubs.


I saw this photo on Pinterest using studs to make a bow at the bottom of the nail against a solid background colour, and I really liked the idea, so I thought why not take that idea and turn it into a Tuxedo. I started off with a base of Essie - Licorice then painted on the triangles using White acrylic paint. Once that was dry, I added a Top Coat to one nail at a time and added the studs.


I got the idea from various images around Pinterest, I really liked the idea of a cross but also wanted to include the Diamond shape of studs too. I didn't want the whole mani to be studded, but was stumped for ideas to add to the pinkie and thumb, so of course, out came the stamping plates. I started off with a base of Essie - Licorice and an accent of A England - Excalibur. I then stamped with BM-223 and BM-314 using Excalibur for the stamping. As I mentioned the photo is a bit blurry since it was taken at night, so I apologise for that.

I loved the way both of these turned out, although after wearing the second mani to work, by the end of the day I had started to pick at the studs, so they didn't last very long. Of course, if you didn't pick at them they'd probably last you a lot longer! You can purchase your own studded wheel here for $4.89 as well as many other tools and decorations for your nails and otherwise! If you use the code below, you'll also receive 10% off of your order!


Sunday, 30 September 2012

Challenge: Day 30 - Inspired By A Tutorial


Hi ladies! It's the last day of the challenge for me and a couple more of you!! I'm actually a little sad that it's over, but I've got some amazing swatches planned to show you all over the course of the next month. Since today is Inspired by a tutorial I chose to do this mani. For my base, I used 2 coats of China Glaze - Traffic Jam and for the details I used Acrylic Paint. I then finished it off with a coat of MASH Matte Polish*.


As if the challenge is over! I can't believe I've made it to the end without giving up or missing a day, though I've been close a few times. Thank you to everyone who has taken part in the challenge with me! I don't think I would have made it to the end if I didn't have anyone to do it with! I hope you've enjoyed the challenge as much as I have! See you in the next one!

Untrieds Used;
China Glaze - Traffic Jam

Friday, 28 September 2012

Challenge: Day 28 - Inspired By A Flag


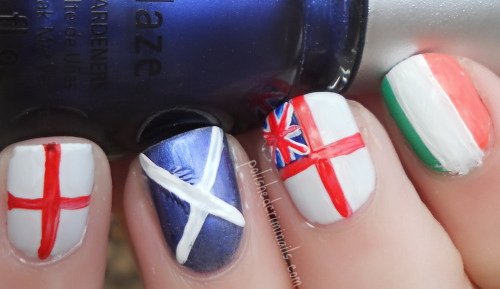
Hi ladies! Just a quick post to show you my 'Inspired By A Flag' mani, I was speaking to my dad earlier whilst wondering what the heck I could do for a flag mani since I didn't want to do just anything, which was probably going to be a Union Jack flag, when it hit me that I should do a flag mani inspired by my dad! He's a Warrant Officer in the Royal Navy and has been in the Navy ever since he was 17 so I knew I wanted to incorporate the Royal Navy flag into my mani, which you can see on my Middle finger. The Irish, Scottish and English flags are for where my dads heritage is from (Ireland), where he lives (Scotland) and where he was born (England). I started off with a base of OPI - My Boyfriend Scales Walls on my Index, Middle and Pinky fingers and a base of China Glaze - Want My Bawdy on my Ring finger, then using acrylic paint for all the detailing except for the Irish Flag, which I used BarryM - Spring Green and OPI - Hot & Spicy.


So there you have my Inspired By A Flag mani for Day 28! Only 2 more days to go! Remember, those of you wanting to add the inlinkz to your own posts, click here to be taken to the google doc with everything you'll need for the next 30 days!
Untrieds Used;
China Glaze - Want My Bawdy

Thursday, 27 September 2012

Challenge: Day 27 - Inspired By Artwork


Hi ladies! Can you believe there's only 3 more mani's to do!? 4 if you're doing the original 31 days! I honestly can't believe I've actually made it this far and that there's still so many of you doing this along with me! Today is Inspired By Artwork, now I'm not really into 'art' as such, so I was a little stuck on what I was going to do, but I knew I wanted to think outside the box with this one. And think outside the box I did, hopefully. I chose my artwork based on British graffiti artist, Banksy, I think the majority of you will know who he is. I started off with a base of OPI - My Boyfriend Scales Walls (shocker!!! I think I have used this polish in almost every challenge day, I need to get myself a back up) on my Index and Ring fingers, Color Club - Nomadic Nude on my middle finger and China Glaze - Concrete Catwalk on my pinkie finger. All the detailing was done using a nail art brush and Acrylic Paint.


The inspiration for my Index finger

The inspiration for my Middle finger

The inspiration for my Ring finger
I absolutely love Banksy and his art, it's so out there and of course, graffiti is somewhat illegal, so it makes the detailing even more amazing since there's only so much time to spare before you're caught. If you're interested in seeing more of Banksy's work, just type his name into google images! There's some amazing images on there! Remember, those of you wanting to add the inlinkz to your own posts, click here to be taken to the google doc with everything you'll need for the next 30 days!


Untrieds Used;
China Glaze - Concrete Catwalk

Tuesday, 25 September 2012

Challenge: Day 25 - Inspired By Fashion


Hi ladies! It's Fashion day today! Now, I'm not going to lie, I had NO idea what to do for this at all. I was trailing through countless images of photos from Fashion Week but nothing really popped out to me. In the end I decided to just go for one of my favourite designer brands, Chanel. Although I don't actually own anything Chanel, besides some make-up (I don't even have any Chanel polishes!), I've always wanted to own a pair of Chanel shoes or a handbag, I will one day fulfil that wish of mine, but until then I will have to make do with just looking. I started off with 2 coats of W7 - Black and then added OPI - My Boyfriend Scales Walls as an accent nail. I then stamped over using bornprettystore stamping polish in White* and BM-310 on my index and pinkie fingers. I then used Acrylic Paint to paint the infamous logo and also to poorly attempt do Coco Chanel's face.


So there you have my poor and unimaginative attempt at Fashion inspired nails. I didn't actually use an untried polish in this mani, which I only realised after taking the photos, so I failed in that aspect, but at least there's still a mani! Remember, those of you wanting to add the inlinkz to your own posts, click here to be taken to the google doc with everything you'll need for the next 30 days!

Monday, 24 September 2012

Challenge: Day 24 - Inspired By A Book


Hi ladies! The end is almost here! I honestly can't believe I've made it to the 24th day and haven't thrown in the towel yet! If you saw my previous 31 Day Challenge attempt when I first started blogging, I gave up around day 12/13...quitter. Today's inspiration post comes from a book. Now I searched high and low for a book that 'inspired' me, and I was about to give up when I thought about 'The Mighty Book Of Boosh' which I bought a long time ago, but it was at my mums house. I knew that this was the book I wanted to do, since the cover is so colourful, so when I went to work on Friday, I stopped by my mums house to pick it up. For this mani, I applied the gradient technique with Purple Professional - 52*, OPI - Dim Sum Plum, beautyUK - Bon Bon*, Essie - Coat Azure and BarryM - Red Wine over a base of OPI - My Boyfriend Scales Walls. I then used Black & White Acrylic paint for the 'eyes', which I messed up since they weren't supposed to be so big, and the mouth. The Pink 'stitching' is China Glaze - Pool Party.


The Mighty Book of Boosh cover.
So there you have my entry for Inspired By A Book, what do you think? I wish I hadn't have messed the eyes up as much, but oh well! Remember, those of you wanting to add the inlinkz to your own posts, click here to be taken to the google doc with everything you'll need for the next 30 days!


Untrieds Used;
Purple Professional - 52
OPI - Dim Sum Plum

Sunday, 23 September 2012

Challenge: Day 23 - Inspired By A Movie


Hi ladies, it's movie day! I was so excited about today's challenge, because I am a HUGE movie buff. My boyfriend and I watch so many movies together that we regularly run out of options. That being said, I didn't know what I wanted to do for today's challenge...until I saw Toy Story on one of the movie channels. Toy Story has to be one of my all time favourite films from my childhood, but I know a lot of people have done Toy Story nails in the past. So I thought I would spice it up a little by doing 'Pixar' inspired nails. I used Acrylic paint for all of the characters, but a different base for each nail, from Index - Pinkie I used; Wet N Wild - Black Creme, OPI - My Boyfriend Scales Walls, BarryM - Cyan Blue & OPI - Your Palapa Or Mine?


If you're unsure of the characters and their origin, I have Mr. Potato Head from the Toy Story films on my Index finger, Mike Wazowski from Monsters Inc on my Middle finger, Dory from Finding Nemo on my Ring finger and Flik from A Bugs Life on my Pinkie. So there you have my Pixar inspired nails for Movie day, I'm quite pleased with how they turned out, especially since I lack in the nail art department! What do you think to them? Remember, those of you wanting to add the inlinkz to your own posts, click here to be taken to the google doc with everything you'll need for the next 30 days!


Untrieds Used;
OPI - Your Palapa Or Mine?

Friday, 21 September 2012

Challenge: Day 21 - Inspired By A Colour


Hi ladies! How are you liking the challenge so far?! I'm so glad to see there's still a lot of bloggers soldiering through, if it wasn't for you ladies I think I may have given up long ago. Just 9 days left! 10 if you're doing the full 31! Day 21 takes us into the 'Inspired By' category, which I must say I'm looking forward to getting down and dirty with and flexing my extremely limited nail art 'skills'. Today's mani is 'Inspired By A Colour' now I've always thought this was a wierd one to have, I mean how can you be inspired by a colour? So I took this to mean inspired by a nail polish colour. The nail polish I was 'Inspired By' was China Glaze - Ruby Pumps for obvious reasons right?! So I painted each one of my nails a different colour Index; OPI - My Boyfriend Scales Walls, Middle; Nails Inc - York Street, Ring; China Glaze - Ruby Pumps, Pinkie; beautyUK - Bon Bon*. I then used Rio Beauty Printing Varnish in White* to stamp with and Mash-50* for my Middle finger and BM-213 for my Ring Finger. I used Acrylic Paints for the Rainbow and 'Road' lines. I then sealed it all in with Models Own 2 in 1 Top Coat.


So there you have my mani Inspired By A Colour. I wish I had switched around the Red & White on my ring finger and actually had 'Ruby Pumps' instead of White ones! Oh well. Remember, those of you wanting to add the inlinkz to your own posts, click here to be taken to the google doc with everything you'll need for the next 30 days!


Untrieds Used;
Nails Inc - York Street


Monday, 3 September 2012

Challenge: Day 3 - Yellow Nails


Hi ladies! Day 3 of the 30 Day Challenge is Yellow Nails! Now I don't know about you, but I'm not a fan of Yellow polish, in total, I have 2 one of which can be seen here, luckily for me, my other Yellow polish is currently untried! For Day 3 I used 3 coats of NYC - Lexington Yellow on my Ring finger then used some French Tip Guides on all my other nails, again with 3 coats of Lexington Yellow. I then used Black & White Acrylic Paints for the details and sealed in the design with one coat of Color Club top coat.


Please excuse my sorry excuse of a Bumblebee! So that ends Day 3 of 30! Remember to check out the other ladies Nails! For those of you wanting to add the inlinkz to your own posts, click here to be taken to the google doc with everything you'll need for the next 30 days!

Untrieds Used;
NYC - Lexington Yellow


Sunday, 2 September 2012

Challenge: Day 2 - Orange Nails


Hi ladies! I'm back again for Day 2 of the 30 Day Challenge, which as you can see from the title of this post is Orange Nails! For today's challenge I started off with 2 coats of OPI - Atomic Orange* and stamped with Born Pretty Store stamping polish in White* mixed with BarryM - Peach Melba and BM-308. I then finished off with a coat of MASH Nails - Matte Top Coat*


Again, it's ALWAYS my pinkie that gets knocked, so please excuse the gigantic smudge, I just can't seem to help myself! Maybe I should wait until my nails are completely dry before I even breathe! What do you ladies think of Day 2 of 30? Remember to check out the other challengers posts! For those of you wanting to add the inlinkz to your own posts, click here to be taken to the google doc with everything you'll need for the next 30 days!

Untrieds used; OPI - Atomic Orange


Products in this post marked with a (*) have been sent to me by the company or their PR for my honest review. For more information, please read my disclosure page!

Saturday, 30 June 2012

Nail Art: A Random Post

Hi ladies! I haven't really got any swatches to show you at the moment, since I've been SO busy lately, I haven't even had the time to swatch and even when I did have a couple hours spare, the weather has been so terrible I didn't want to do it anyway, ahhhh British summer weather...I do, however, have a quick 'Nail Art' post to show you that I wore on my nails last week. I'm not really sure what to call it, I've heard them being called 'Geometric' so, I suppose, that is what they are.
For the mani, I used China Glaze; Sea Spray (from the Anchors Away collection) and Light As Air (from the Up & Away collection) and Collection 2000; Candy Floss.


I didn't want to go too bright with the colours, so I kept it simple with cute pastels. I thought these went really well together, although I wish I had chosen a slightly darker shade of pastel purple. 

Here is the finished mani, you'll have to excuse the dodgey clean up, I made the mistake of painting the middle colour first, instead of going from bottom to top. Whoops, rookie mistake!


What do you ladies think? Sorry this is such a short post! I will hopefully be back to posting some regular swatches soon!

Saturday, 2 June 2012

Nail Art: Lovely Jub-ilee

Hi ladies! As some of you may be aware, this weekend in the UK will be filled with celebrations as the Queen celebrates 60 years on the throne, otherwise known as the Diamond Jubilee. In order to commemorate such an event, a group of bloggers and I have come together again (as we did in the Holo-day post) for an 'All Things British' collaboration. The theme for the post was to ONLY use UK brands to either create some Nail Art or just general one colour nails. Now since last time I sort of flaked out on the amazing Nail Art that could have been done with my holos, I decided to go all out this time around! Being British, this was an easy post for me to do since I have access to every UK brand there is, not to mention I felt a little Patriotic doing so too. So without further ado, let's have a look at my little creation shall we?


These took me forever and a day to complete, which surprised me, as I usually give up or get bored after a while. The outcome isn't quite what I wanted it to be, mainly because I had made the white diagonal lines a little too thin to add a red line through the middle, but hey! I still think it looks good! I even patted myself on the back after finishing them! LAME. I can do a little tutorial post on this if some of you would like to see how I achieved this semi-decent mani. Just let me know in the comments and I will see what I can do!

 The polishes I used for this mani were;


GOSH: Lambada (Red) - Yes, I later realised that GOSH is actually a Danish brand, but it was too late to change it now. But you can get them in UK drugstores, so that counts, right?!
Models Own: Snow White (White)
BarryM: Cobalt Blue (Blue)


If you're in the UK, what are you doing this weekend to celebrate the Jubilee? I'm going to a street party Saturday and also having a family BBQ on Monday! If you're not in the UK, what are your plans for this weekend? I'd love to hear them! In the meantime, remember to check out the other ladies Jubilee nails!